
The pedigree of honey Does not concern the bee; A clover, any time, to him Is aristocracy.
~ Emily Dickinson
I've had so much going on around here lately between work, which has been very stressful and getting the basics done around here that finding time to post has been difficult. Not to mention I have also contracted a serious case of writer's block. I'm going to attribute that to just being tuckered out. Every time I sit down to write, I just can't get the words to flow. Everything I write seems stilted and boring. In any case, the best way to get over a hump is just to push yourself over it. So, I'm going to start with our latest hive inspection and just start typing. I hope you don't mind.
While we've been experiencing a cold snap the past week or so, we had the luxury of some spring-like weather a few weeks ago. Sunny, in the 60s and little to no wind make for perfect condition to do an early spring check on our bee hive. Deborah, who is my mentor, and I approached the hive and just observed the activity for a minute or two. The bees were busy bringing in pollen, but Deborah also noted a dead larvae at the entrance. Her first impression was mites, so we knew we had to pay close attention once in the hive. Upon opening the hive, we noticed good activity in the top super. I was extremely excited to note that several frames were filled top to bottom with capped honey, picture perfect I might add. While I am itching to harvest my first honey, it's still too early in the season to start taking as we always get another cold snap around the first of April. I want them to have good stores to eat between now and then. The second box down was our first hive body. It was full of capped and uncapped brood as well as capped honey and plentiful pollen. The different colors of the pollen collected created a quilt effect, red, yellow, orange, white. It was lovely. The bottom hive body was not as full of brood, either capped or uncapped, and since bees travel upward, it was apparent the queen was spending most of her time in the top hive body. We don't want them to feel crowding and start thinking about swarming, so we flipped the top and bottom hive bodies and put the full one on the bottom. Now the queen can still stay in the top hive body and feel like she has plenty of space to lay eggs. Since we have a partially full super of honey, we also added another super on the top. Now the bees can continue storing honey upward. We also did not find any swarm cells. Members of my bee club are already dealing with swarms, so diligence is key right now.
Okay, that was the good stuff. Now for the bad stuff. We have mites and a virus associated with mites called deformed wing virus. We spotted one bee with deformed wing virus, which means the wings are shriveled up. To treat the mites, we dusted all of the frames and bees with powdered sugar. This is supposed to be a non-chemical, very effective treatment. The bees start grooming themselves to get the sugar off, and in doing so, dislodge the mites. The mites fall to the ground and die. I imagine it's basically the same principle as a chicken taking a dust bath. The hive beetles persist, but that is to be expected in almost any hive. The way we handle hive beetles is based on a strategy given to us by a beekeeping with many years of beekeeping under his belt. Instead of using an inner cover, he places a sheet of plastic over the top of the super and then places the outer cover. The bees glue down the plastic with propolis (bee glue made from plant resins to seal cavities and keep out invaders). They actually create little tunnels with the propolis and trap the hive beetles in the tunnel. Once you take the outer cover off and expose the plastic, you can squash the hive beetles that are trapped at the top. Once a hive beetles is dead, it is dragged down into the hive by a housekeeping bee and discarded. It is so interesting to watch the bees pull the dead hive beetle away. Of course, there are other methods to deal with hive beetles, but that's the one we have adopted.
Another inspection is due, so hopefully the powdered sugar will have done some good.
Happy beekeeping,
Candace
Wednesday, February 22, 2012
Sunday, February 5, 2012
Trees Down
Boy have we had so much going on around here lately! First off, I had seven trees taken down this week, one in my yard and six in my neighbor's yard to the east along our fence line. They have been on my list for nine years, and I finally had the guts and money to take them down. It is going to make a huge difference in my backyard and my front one as well. Of the seven, six were hardwoods, so we kept those for fire wood. I am happy we can recoup some of the cost back in firewood. And I'm hoping this will eventually pay dividends in the veggie/fruit growing arena. Needless to say, we have alot of cutting and clean up to do.
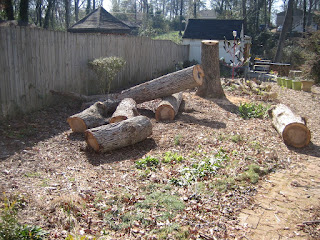
This is how shady the east side of my backyard was before we took down trees even with no leaves on the trees. In the summer, the canopy from this oak tree along with the pine tree to the immediate left kept this part of the yard in shade until early afternoon.

Now that the trees are gone we are already noticing a big difference in light in this area.
I know my neighbors are hating me. They probably call me the crazy tree lady, and even one of the tree guys asked, "You don't like trees, do you?" I love trees, just not ones that keep me from gardening. Believe me, there are plenty more around my house. There is no danger of running out of trees in my neighborhood.
Now, I have a 14'x60' section to plan. I would love to line the fence with espalier fruit trees, but my worry is when I put raised beds down the section, what I grow in the raised beds may grow too tall and block sun off the trees in the afternoon. Because of the fence, the trees would not get morning sun immediately, so I would need to depend on the afternoon sun to provide enough sunlight. Or I can still plant fruit trees along the fence but limit their height by multiple prunings each year. This method takes more space horizontally, so I eat up some of my 14' when planning out my raised beds. I definitely need raised beds because I am dealing with solid clay for the most part. It is rock hard. I would love to hear your thoughts and ideas on how to tackle this area. I have a blank slate, and I want to plan it right.
Shockingly, Nate has also offered to rework our sprinkler system in this area. This whole area is one zone on our system, so I can configure it in any way I want and only use it when I think most necessary. I generally water my raised beds from the rain barrels, but on occasion, I would like to have the sprinkler system as a backup. I know I would like to have a connection to each raised bed and to each tree. I need to research drip irrigation and sprinkler systems. Any ideas from you on this?
This is definitely a long term project, but the biggest hurdle was the trees in my opinion.
Happy homesteading,
Candace
This is how shady the east side of my backyard was before we took down trees even with no leaves on the trees. In the summer, the canopy from this oak tree along with the pine tree to the immediate left kept this part of the yard in shade until early afternoon.

Now that the trees are gone we are already noticing a big difference in light in this area.

I know my neighbors are hating me. They probably call me the crazy tree lady, and even one of the tree guys asked, "You don't like trees, do you?" I love trees, just not ones that keep me from gardening. Believe me, there are plenty more around my house. There is no danger of running out of trees in my neighborhood.
Now, I have a 14'x60' section to plan. I would love to line the fence with espalier fruit trees, but my worry is when I put raised beds down the section, what I grow in the raised beds may grow too tall and block sun off the trees in the afternoon. Because of the fence, the trees would not get morning sun immediately, so I would need to depend on the afternoon sun to provide enough sunlight. Or I can still plant fruit trees along the fence but limit their height by multiple prunings each year. This method takes more space horizontally, so I eat up some of my 14' when planning out my raised beds. I definitely need raised beds because I am dealing with solid clay for the most part. It is rock hard. I would love to hear your thoughts and ideas on how to tackle this area. I have a blank slate, and I want to plan it right.
Shockingly, Nate has also offered to rework our sprinkler system in this area. This whole area is one zone on our system, so I can configure it in any way I want and only use it when I think most necessary. I generally water my raised beds from the rain barrels, but on occasion, I would like to have the sprinkler system as a backup. I know I would like to have a connection to each raised bed and to each tree. I need to research drip irrigation and sprinkler systems. Any ideas from you on this?
This is definitely a long term project, but the biggest hurdle was the trees in my opinion.
Happy homesteading,
Candace
Subscribe to:
Posts (Atom)